這邊就只是很簡單記錄一下我花了3天從0開始到發布的一些過程。
資料庫
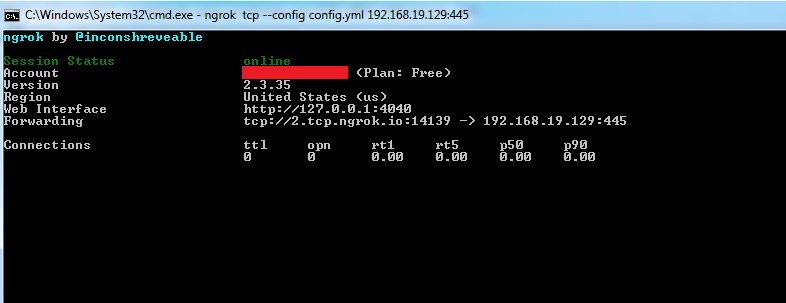
Hostinger
在寫一代的時候一直有一個遺憾就是沒有串聯資料庫,所以第二代就打算讓我的幹話語錄連接到一個線上的資料庫,而在搜尋了半天後發現我的網站所使用的HOSTINGER其實就有架設SQL 資料庫的功能,那架設的方式也很簡單點選畫面中的database你就可以創造一個你自己的資料庫,創建好之後記得要到remote SSL去開放外界連接。


用 python 快速連接
然後呢我就使用Python去連接資料庫並且創一個新的table,裡面會存取 C_ID, 案讚人數,案不喜歡的人數 以及他的詳細資訊。
import pymysql
db = pymysql.connect(host=host, port=port, user=user, passwd=passwd, db=dbname)
cursor = db.cursor()
cursor.execute("""CREATE TABLE tablename (
C_ID INT AUTO_INCREMENT,
WORD TEXT,
LIKE INT,
UNLIKE  INT,
DETAIL TEXT
);""")

db.close()
接著我們就可以使用pandas去讀取我過去的幹話並且上傳上去,

Android stduios
我手機呢則是使用Android Studio + kotlin來寫的,基本上呢我不會寫kotlin,所以一切的功能我都會直接查詢網上解答並且直接套用。
SQL
那麼剛開始我第一個要製作的功能,也是最重要的就是連接資料庫,根據我各種查詢以及嘗試,使用了三種不同SQL的Jar庫,終於成功了連上了!
之所以會試著這麼多就是沒有發現到我使用的資料庫是MariaDB,我之前面一直在嘗試使用MYSQL的套件包去連接發現不管怎麼連都連不上,千萬不要像我一樣這麼智障。
那麼連接的方式呢就是要先去下面下載這個jna.jar
https://jar-download.com/?search_box=net%20java%20dev%20jna
把下載的檔案放到libs 裡面之後,在build.gradle裡面增加下面兩行

再來就可以嘗試使用JDBC連接資料庫
var stat:Statement?=null
var resu:ResultSet?=null

private fun connectFuncSQL(): Connection? {
    val connectionProps = Properties()
    connectionProps["user"]     = user
    connectionProps["password"] = password
    Log.d("MYSQL", "Start connection")
    // connect with mariaDb
    try {
        val conn = DriverManager.getConnection(
            "jdbc:mariadb://$host:$port/dbname",connectionProps)
        Log.d("MYSQL", "connection successful")
        return conn
    } catch (ex: SQLException) {
        Log.e("MYSQL", ex.message.toString())
        ex.printStackTrace()
    } catch (ex: Exception) {
        Log.e("MYSQL", ex.message.toString())
        ex.printStackTrace()
    }
    return null
}
如果成功連上了就可以開始下載資料庫上面的資料,我會將下載好資料使用 getSharedPreferences 的存到使用者手機裡。
@SuppressLint("ApplySharedPref")
private fun updateFunc(){
    val conn = connectFuncSQL()
    try {
        stat = conn?.createStatement()
        Log.d("MYSQL", "CreateStatement")

        val gson = Gson()
        val sharedPref = getSharedPreferences("sqlDATA",Context.MODE_PRIVATE) ?: return
        resu = stat?.executeQuery("SELECT * FROM `table_name`;")
                    Log.d("MYSQL", "call table")

        var funcCidArr    : Array<Int>    = arrayOf<Int>()
        var funcWordArr   : Array<String> = arrayOf<String>()
        var funcDetailArr : Array<String> = arrayOf<String>()
        var funcLikeArr   : Array<Int>    = arrayOf<Int>()
        var funcHateArr   : Array<Int>    = arrayOf<Int>()
        runOnUiThread {
                Toast.makeText(this, "下載資料中...",Toast.LENGTH_SHORT).show()
            }
        while(resu?.next() == true){
                val funcCid    :Int    = resu?.getInt("C_Id")!!
                val funcWord   :String = resu?.getString("WORD").toString()
                val funcDetail :String = resu?.getString("DETAIL").toString()
                val funcLike   :Int    = resu?.getInt("LIKE")!!
                val funcHate   :Int    = resu?.getInt("UNKILE")!!

                funcCidArr    += funcCid
                funcWordArr   += funcWord
                funcDetailArr += funcDetail
                funcLikeArr   += funcLike
                funcHateArr   += funcHate

            }
        Log.d("MYSQL", "Writing data")
        val editor = sharedPref.edit()
        editor.putString("funcCidArr", gson.toJson(funcCidArr))
        editor.putString("funcWordArr", gson.toJson(funcWordArr))
        editor.putString("funcDetailArr", gson.toJson(funcDetailArr))
        editor.putString("funcLikeArr", gson.toJson(funcLikeArr))
        editor.putString("funcHateArr", gson.toJson(funcHateArr))
        editor.commit()
        runOnUiThread {
                Toast.makeText(this, "資料已是最新版",Toast.LENGTH_SHORT).show()
            }
        }catch (ex: Exception) {
            Log.e("MYSQL", ex.message.toString())
            ex.printStackTrace()
        }finally {
            conn?.close()
        }

   }
動畫
按鈕標題
為了讓我APP看起來更好看一點,我在許多的地方都加了一些動畫,例如打開程式時按鈕會從左邊依序往右邊跑,還有幹話語錄的”2″會由上而下的滑下來,為了做到這些我們需要寫一個自定義的XML檔
那首先這個是幹話語錄中的”2″ ,其實寫法也很簡單只需要給他初始位置終點位置然後最後是所花的時間
<?xml version="1.0" encoding="utf-8"?>
<set xmlns:android="http://schemas.android.com/apk/res/android">
    <translate
        android:fromXDelta="0%"
        android:fromYDelta="-100%"
        android:duration="1800"/>

    <alpha
        android:fromAlpha="0.3"
        android:toAlpha="1.0"
        android:duration="1800" />
</set>
而至於按鈕地成左至右呢,寫法是一模一樣的,那如果要讓按鈕依序出來走我們只要改變duration的時間就好了。
<?xml version="1.0" encoding="utf-8"?>
<set xmlns:android="http://schemas.android.com/apk/res/android">
    <translate
        android:fromXDelta="-100%"
        android:fromYDelta="0%"
        android:duration="1000"/>
</set>
頁面切換
頁面切換的時候我也希望有動畫,可以用滑的來切換不同的頁面,這個其實也用寫XML檔來達到,只是我們需要寫兩個,一個負責處理頁面離開,一個負責處理頁面進來。
離開
<?xml version="1.0" encoding="utf-8"?>
<set xmlns:android="http://schemas.android.com/apk/res/android">
    <translate
        android:fromXDelta="0%"
        android:fromYDelta="0%"
        android:toYDelta="100%"
        android:duration="200"/>
</set>
進來
<?xml version="1.0" encoding="utf-8"?>
<set xmlns:android="http://schemas.android.com/apk/res/android">
    <translate
        android:fromXDelta="0%"
        android:fromYDelta="-100%"
        android:toYDelta="0%"
        android:duration="200"/>
</set>
接著只要再切換頁面的時候加以下這一句就好了
override fun onBackPressed() {
        super.onBackPressed();
        overridePendingTransition(R.anim.slide_up_activity_into, R.anim.slide_up_activity_leave);
    }
幹話總覽
在開始前我們先看一下成品
可以看到這是一個清單,將所有的幹話排排列在上面,跟清單不一樣的是,他下面有按讚跟倒讚可以按,還有愛心 !
那要做到這樣子的我們需要一個自定義的adapter,用來告訴他每一行的元素該放什麼字該做什麼事情,我們還要自定義一個Layout,用來告訴他我們的文字按鈕該怎麼排列擺放。
自定義Layout
下面是我自定義的 CustonLayout.xml
<?xml version="1.0" encoding="utf-8"?>
<LinearLayout xmlns:android="http://schemas.android.com/apk/res/android"
    xmlns:app="http://schemas.android.com/apk/res-auto"
    android:layout_width="match_parent"
    android:layout_height="match_parent"
    android:orientation="vertical"
    android:padding="4dp">

    <TextView
        android:id="@+id/tvContact"
        android:layout_width="match_parent"
        android:layout_height="100dp"
        android:textSize="18sp"
        android:gravity = "center"
        android:clickable="true"
        android:textStyle="bold" />

    <LinearLayout xmlns:android="http://schemas.android.com/apk/res/android"
        android:layout_width="match_parent"
        android:layout_height="match_parent"
        android:orientation="horizontal"
        android:layout_gravity = "right"
        android:padding="8dp">

        <com.like.LikeButton
            app:icon_type="thumb"
            app:icon_size="15dp"
            android:id="@+id/btn1"
            android:layout_marginStart="10dp"
            android:layout_width="50dp"
            android:layout_height="50dp"/>

        <TextView
            android:id="@+id/likeText"
            android:layout_width="wrap_content"
            android:layout_height="match_parent"
            android:layout_marginStart="10dp"
            android:textSize="30sp"
            android:layout_marginTop="5dp"
            android:gravity = "center_horizontal" />

        <com.like.LikeButton
            app:icon_type="thumb"
            app:icon_size="15dp"
            app:like_drawable = "@drawable/thumb_unlike"
            app:unlike_drawable="@drawable/thumb_off"
            android:rotation="180"
            android:id="@+id/btn2"
            android:layout_marginStart="20dp"
            app:circle_start_color="#000000"
            app:circle_end_color="#000000"
            android:layout_width="50dp"
            android:layout_height="50dp"/>

        <TextView
            android:id="@+id/hateText"
            android:layout_width="wrap_content"
            android:layout_marginStart="10dp"
            android:layout_height="match_parent"
            android:layout_marginTop="5dp"

            android:textSize="30sp"
            android:gravity = "center_horizontal" />

        <com.like.LikeButton
            app:icon_type="heart"
            app:icon_size="15dp"
            android:id="@+id/btn3"
            android:layout_alignParentRight="true"
            android:layout_marginStart="20dp"
            android:layout_gravity="right"

            android:layout_width="50dp"
            android:layout_height="50dp"/>
        <TextView
            android:id="@+id/textViewBlank"
            android:layout_width="match_parent"
            android:layout_height="match_parent"
            android:clickable="true"/>

    </LinearLayout>
</LinearLayout>
可以看到我的按鈕上面還有讚跟愛心,這個呢我是使用 :
https://github.com/jd-alexander/LikeButton
用法也很簡單只要先把以下文字放到setting.gradle
allprojects {
	repositories {
		...
		maven { url "https://jitpack.io" }
	}
}

然後再增加dependencies

接著你就可以在你的Layout裡面使用這個酷酷的讚跟愛心按鈕了
那他的按跟不按呢其實是使用圖片來偽裝成按下去的感覺,所以如果要改按下去後的顏色,必須在外面自己製作一個不同顏色的讚,再去更改它的drawable屬性
      <com.like.LikeButton
            app:icon_type="thumb"
            app:icon_size="15dp"
            app:like_drawable = "@drawable/thumb_unlike"
            app:unlike_drawable="@drawable/thumb_off"
            android:rotation="180"
            android:id="@+id/btn2"
            android:layout_marginStart="20dp"
            app:circle_start_color="#000000"
            app:circle_end_color="#000000"

            android:layout_width="50dp"
            android:layout_height="50dp"/>
自定義 Adapter
自定義一個adapter,我們會需要自己開一個新的class。
class MyAdapter(val context:        Activity    ,
                val funcCidArr:     MutableList<Int>   ,
                val funcWordArr:    MutableList<String>,
                val funcDetailArr:  MutableList<String>,
                var funcLikeArr:    MutableList<Int>   ,
                var funcHateArr:    MutableList<Int>) :  ArrayAdapter<String>(context, R.xml.customlayout,funcWordArr) {

override fun getCount(): Int {
        return funcWordArr.size
    }

override fun getItemId(position: Int): Long {
        return position.toLong()
    }

 @SuppressLint("ResourceType", "ViewHolder", "InflateParams", "SetTextI18n", "CutPasteId")
    override fun getView(position: Int, convertView: View?, parent: ViewGroup): View {
        val layoutInflater = context.layoutInflater
        val rowView = layoutInflater.inflate(R.xml.customlayout, null,true)
        val textPart = rowView.findViewById<TextView>(R.id.tvContact)
        val likeText = rowView.findViewById<TextView>(R.id.likeText)
        val hateText = rowView.findViewById<TextView>(R.id.hateText)

        val blackText = rowView.findViewById<TextView>(R.id.textViewBlank)
        textPart.text = funcCidArr[ position].toString() + ". "+ funcWordArr[position]
        likeText.text = numtoK(funcLikeArr[position])
        hateText.text = numtoK(funcHateArr[position])

        return rowView
}
}
上面是我程式的一個大概架構,因為我的程式中含有廣告投放,還有伺服器的連接(按讚跟倒讚),還有全部按鈕的listener,所以我這邊就把一些比較重要的show出來。
複製文字
複製文字的部分我是建一個listener,如果按如果使用者按了文字,就會將文字複製到他的剪貼簿裡。
textPart.setOnClickListener{view->
    if (funcDetailArr[position] != "None") {
                var thieDetail = funcDetailArr[position]
                if ("政治" in thieDetail) {
                    thieDetail = "\t\t"+ thieDetail.subSequence(3, thieDetail.length).toString()
                }
                showAlert(thieDetail)
            }else{
                showAlert("此幹話沒有出處")
            }

            val clipboard: ClipboardManager =
                context.getSystemService(Context.CLIPBOARD_SERVICE) as ClipboardManager
            val clip: ClipData = ClipData.newPlainText("func_say", funcWordArr[position])
            clipboard.setPrimaryClip(clip)
//            toast?.cancel()
//            toast = Toast.makeText(context,"已複製進剪貼簿", Toast.LENGTH_SHORT)
//            toast?.setGravity(Gravity.BOTTOM,0,0)
//            toast?.show()
        }
showAlert
showalert是負責處理當使用者按下文字之後跳出的彈出視窗
fun showAlert(string: String){

    val dialog: AlertDialog = object : AlertDialog(context, R.style.CustomDialog) {
        override fun dispatchTouchEvent(event: MotionEvent): Boolean {
            dismiss()
            return false

        }
    }
    dialog.setMessage(string)
    dialog.setCancelable(true)
    dialog.show()

}
其中 dispatchTouchEvent 是用來處理使用者只要點任一的地方都會將這個彈出視窗關閉。
按讚功能
按讚功能,按下去的瞬間會將手機端的按讚人數加一,並且同時跟資料庫講這個數字要加一,所以這些按讚並不是實時更新的,而是會等到下次你打開APP時才會更新。
"""UPDATE `table_name` SET $Label = $Label $operator 1 WHERE C_ID = $id;"""Adapter 使用
Adapter 的使用也其實很簡單只要告訴ListView就好了
val mList: ListView = findViewById<ListView>(R.id.listview)
val customAdapter = MyAdapter(
            this,
            funcCidArr,
            funcWordArr,
            funcDetailArr,
            funcLikeArr,
            funcHateArr
        )
mList.adapter = customAdapter
上架
上架期實也很簡單,先打包,打包的時候他會請你做一個金鑰那其實按照他的步驟做就可以了,打包完之後呢,我們需要開通Google Play Console的開發者資格需要25美金,但只要開通一次就好了。

點擊建立應用程式

然後把該打的打,把勾的勾,該填的填,按下確認鍵就好了。

左邊滑到底有一個應用程式內容,記得要將裡面的東西都完成,才有辦法發佈你的APP。

而這個隱私權政策,則會需要你提供一個隱私權網址,這個網址是我用以下https://app.privacypolicies.com/wizard/privacy-policy 生成的

最後在正式版裡面建立一個新版本,上傳完之後,等待Google審核,審核成功,你的APP就成功發佈出去了。


:no_upscale()/cdn.vox-cdn.com/uploads/chorus_asset/file/22803360/99nShh7.png)